Tuesday, May 25, 2010
UEFI as a BIOS Course
I see over at http://biosism.com/ that some folks are gearing up to teach a course in "BIOS" with a focus on UEFI.
Monday, April 05, 2010
UEFI HII Hacking
Interesting account of folks trying to hack the IFR in a Sony Vaio to enable hidden BIOS features. I suspect we'll see a lot more of this type of thing now that much of the setup data is exposed in a format that can easily be parsed. This reminds me of what happened once ACPI became widespread and the ACPI Machine Language (AML) could be disassembled and modiifed. Some of the early virtualization attacks used the hardware primitives built into AML to subvert OS security. This is less of a risk with HII, since IFR doesn't have hardware primitives and doesn't generally give any more rights to system resources than would already be available to an application that could run pre-OS in UEFI.
Here is the thread about hacking HII: http://forum.notebookreview.com/showthread.php?p=6104265
Here is the thread about hacking HII: http://forum.notebookreview.com/showthread.php?p=6104265
Monday, March 15, 2010
UEFI Testing Workshop Announced For 6/21/10.
Just received notice that there is another UEFI test workshop (see below), free for all UEFI members. I presume that means adopters, contributors and promoters. I haven't seen the note yet on the official web site yet. These workshops are really good for inter-op testing between BIOS vendors, chipset vendors, OS vendors, plug-in card vendors and UEFI software vendors. In addition, you often get to meet a lot of the folks who have put together the UEFI specification and talk directly to the self-cert test developers if you have questions. Hope to see you there!
Tim
Dear UEFI Developers,
The UEFI Testing Work Group (UTWG) and the UEFI Industry Communications Work Group (ICWG) from the Unified EFI (UEFI) Forum would like to invite you to the next UEFI testing workshop event / PlugFest.
This event will be held at the Intel Dupont Optimization Lab Facility in Dupont, Washington in the week of June 21, 2010. The Intel Dupont campus is located approximately one hour south of the Seattle area.
The event is open and free to all attendees from companies that are UEFI members. We encourage companies who are not yet on the UEFI member's list to sign up through the http://www.uefi.org and get ready to participate.
Upon receiving your participation response and interest, we will send you a logistics package to help you prepare for a successful test event. Additionally, participants are encouraged to download, run and submit the UEFI Self Certification Tests (SCT) results to the UTWG prior to the event.
Participants in the test event will include UEFI members who are Add-in Card Vendors / Independent Board Vendors (IBV), Operating System Vendors (OSV), Independent Software Vendors (ISV), Independent BIOS Vendors and Original Equipment / Design Manufacturers (OEM / ODM) and Platform Vendors.
The purpose of this event is to provide the computing industry with an opportunity to conduct a variety of interoperability tests with implementers and implementations of UEFI among the UEFI community. This event will allow add-in cards to run the UEFI SCT on various UEFI system implementations and to test using a variety of Operating Systems.
If you know of any other groups/divisions in your company that would benefit from attending, please forward this letter to them.
Please respond to xxx (@intel.com) by April 2, 2010 to let us know your participant status in this event.
You can also reach Laurie at xxx.
We look forward to seeing you in Dupont!
Wednesday, March 03, 2010
IDF 2010 Beijing Features UEFI
There are a number of UEFI-related sessions at IDF this year (see http://www.intel.com/idf). Included are sessions on multi-processor, fast boot, EDK2, firmware security and cool mobile stuff for UEFI.
UEFI 2.3b Released.
The latest version of the UEFI specification (v2.3b, with updated errata) is now available here.
Sunday, February 28, 2010
UEFI HII (Part 11): Image Package Encoding
The UEFI specification describes a standard set of APIs for drawing bitmaps. The HII Image protocols (as well as the Graphics Output protocol) only deal with bitmaps as arrays of 32-bit pixels. But UEFI also describes a standard way that these bitmaps (or images, as the specification calls them) should be encoded as resources (or packages).
Within the packages, images are encoded in 5 different ways:
 Image packages are very similar in concept to the string packages described before. They always start with the header:
typedef struct _EFI_HII_IMAGE_PACKAGE_HDR {
EFI_HII_PACKAGE_HEADER Header;
UINT32 ImageInfoOffset;
UINT32 PaletteInfoOffset;
} EFI_HII_IMAGE_PACKAGE_HDR;
There are two offsets: the first is to the series of image blocks which describe the images themselves. The second is to the palette information.
The palette information consists of zero or more palettes. Each palette is an array of 32-bit color values, assigned an index between 0 and 255. Images can refer to a palettte and can share a palette. Palettes are not required to carry all 2 (1-bit), 16 (4-bit) or 256 (8-bit) colors but rather only those actually necessary for the images carried in the package.
The image information consists of zero or more image blocks, terminated by a special image block of type IIBT_END. Images are encoded in ascending order by their image identifier, starting with the value 1. Each image block does one of the following:

- 1-bit per pixel with palette. Each pixel in the image is encoded as a single bit within a byte. Each row of the image is padded to a byte boundary (as with font glyphs). Both the 0 and 1 values can be translated to a full 24-bit color value if a palette entry is provided.
- 4-bits per pixel with palette. Each pixel in the image is encoded as 4 bits within a byte. Each row of the image is padded to a byte boundary. Each of the 16 possible pixel values can be translated to a full 24-bit color value if a palette entry is provided.
- 8-bits per pixel with palette. Each of the 256 possible pixel values can be translated to a full 24-bit color value if a palette entry is provided.
- 24-bits per pixel. Each pixel takes up exactly 3 bytes, one each for red, green and blue.
- JPEG. Support is required for high (1:1:1) and medium (4:1:1) quality JPEG encoding for R/G/B. There are many other sub-types of JPEG encoding, such as gray-scale encoding for medical imaging, which are not required to be supported.

EFI_HII_PACKAGE_HEADER Header;
UINT32 PaletteInfoOffset;
} EFI_HII_IMAGE_PACKAGE_HDR;
The palette information consists of zero or more palettes. Each palette is an array of 32-bit color values, assigned an index between 0 and 255. Images can refer to a palettte and can share a palette. Palettes are not required to carry all 2 (1-bit), 16 (4-bit) or 256 (8-bit) colors but rather only those actually necessary for the images carried in the package.
- Associate a normal image with the current image identifier value.
- Assocate a transparent image with the current image identifier value. Transparent images specify that the color value 0 should not be drawn.
- Associate a previous image with the current image identifier value.
- Skip a specified number of image identifier values.

Conclusion
Images are just one of the many types of HII-related resources supported by the UEFI specification. The images are included in package lists which can be attached as part of the PE/COFF resources or loaded as separate files or file sections. Next time we will start looking at the most interesting of the HII constructs: the form, which encapsulate configuration settings.
Tuesday, February 16, 2010
WHY: Why Do I Get Unresolved Externals For __allmul?
While I was working on my project this week, I kept running into the following error:
CLibApp.lib(String.obj) : error LNK2019: unresolved external symbol __allmul referenced in function _wcssize
CLibApp.lib(Cwd.obj) : error LNK2001: unresolved external symbol __allmul
This function appears nowhere in my code, nor does it appear in any of the EDK's code? So what's going on? It turns out that this function is one of several compiler support functions that are invoked explicitly by the Microsoft C/C++ compiler. In this case, this function is called whenever the 32-bit compiler needs to multiply two 64-bit integers together. The EDK does not link with Microsoft's libraries and does not provide this function.
So why don't all the other drivers and applications in the EDK generated unresolved externals, since they obviously do 64-bit math? The EDK authors skirted this problem by creating 64-bit math routines of their own, such as MultU64x64 and MultU64x32 and using these instead of the built-in C/C++ multiply (*) operator.
Are there other functions like this one? Sure, several more for 64-bit division, remainder and shifting.
Interestingly enough, the EDK does contain some Microsoft C/C++ compiler support. See CompilerStub.c where both memcpy and memset (from the C standard library) are defined. Why? It turns out that later versions of the compiler optimize certain code sequences by calling the library routines. Want a little stranger bit of trivia? The EfiCommonLib tries to optimize the SetMem function by special-casing a set to zero (i.e. SetMem (dest, count, 0)). But it turns out that the C compile convers both branches into a call to memset.
Anyway, here is my implementation of the multiplication routine. The Microsoft version is available, but has their license. The other versions available on the web look an awful lot like the Microsoft version, down to the comments, so I reverse engineered the calling convention (old-style STDCALL) and wrote it from scratch in MASM 9.0.
Tim
; allmul - 64-bit signed multiplication support function.
.586
.MODEL FLAT, C
.CODE
;
; FUNCTION NAME.
; _allmul
;
; FUNCTIONAL DESCRIPTION.
; This function is called by the Microsoft Visual C/C++ compiler for 32-
; bit executables to multiply two 64-bit integers and returning a 64-bit
; result. The X86 processors have only a 32-bit multiply instruction,
; thus the necessity for a library support function.
;
; The operands are divided into two 32-bit quantities. You can imagine
; that this works like simple 2-digit x 2-digit multiplication, except
; that each digit is 32-bits wide.
;
; AB
; x CD
; ----
; DB
; DA0
; CB0
; CA00
; ----
; RRRR
;
; You notice that the 3rd and 4th columns never will be used because the
; are the part of the result that is > 64-bits.
;
; R[0:31] = DB[0:31]
; R[32:63] = DB[32:63] + DA[0:31] + CB[0:31]
;
; There is a short cut, if both A and C are 0, then we can use the simple
; 32-bit instruction.
;
;
; ENTRY PARAMETERS.
; multiplicand - Right-hand operator (CD)
; multiplier - Left-hand operator (AB)
;
; EXIT PARAMETERS.
; EDX:EAX - Result.
;
_allmul PROC NEAR USES ESI, multiplicand:QWORD, multiplier:QWORD
MA EQU DWORD PTR multiplier [4]
MB EQU DWORD PTR multiplier
MC EQU DWORD PTR multiplicand [4]
MD EQU DWORD PTR multiplicand
mov eax, MA
mov ecx, MC
or ecx, eax ; both zero?
mov ecx, MD
.if zero? ; yes, use shortcut.
mov eax, MB
mul ecx ; EDX:EAX = DB[0:63].
.else
mov eax, MA
mul ecx ; EDX:EAX = DA[0:63].
mov esi, eax ; ESI = DA[0:31].
mov eax, MB
mul MC ; EDX:EAX = CB[0:63]
add esi, eax ; ESI = DA[0:31] + CB[0:31]
mov eax, MB
mul ecx ; EDX:EAX = BD[0:63]
add edx, esi ; EDX = DA[0:31] + CB[0:31] + DB[31:63]
; EAX = DB[0:31]
.endif
ret 16 ; callee clears the stack.
_allmul ENDP
END
Friday, February 12, 2010
HOW-TO: Debug The EDK's Windows-Hosted UEFI Environment
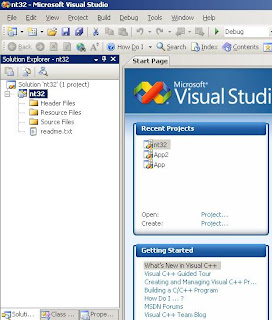
Last time we took a quick look at how to set up the Windows-hosted (NT32) UEFI environment provided by the EDK. The NT32 environment is very useful for debugging UEFI applications which aren't tied to specific hardware devices. So this week, I'll show how to add on debugging support.
This article assumes that you have already loaded the Visual Studio project to build the EDK's NT32 platform in C:\EDK as described previously.
 1. Select the NT32 project in the Solution Explorer.
 2. Select Project|Properties
 3. In the "NT32 Properties Pages" select "Debugging"
 4. Select "Command" and enter "SecMain.exe".
5. Select "Working Directory" and enter "c:\edk\sample\platform\nt32\uefi\ia32".
 6. Select "Environment" and select the ...
 7. An editor will pop up. In the editor box, enter the following and the click "OK". These are environment variables which govern how the emulator works, how much memory it uses, what virtual devices it has access to, etc. We will discuss these more in the next article.
EFI_WIN_NT_PHYSICAL_DISKS=a:RW;2880;512!g:RW;262144;512
EFI_WIN_NT_VIRTUAL_DISKS=FW;40960;512
EFI_WIN_NT_SERIAL_PORT=COM1!COM2
EFI_WIN_NT_GOP=Graphics Output Window 1!Graphics Output Window 2
EFI_WIN_NT_UGA=UGA Window 1!UGA Window 2
EFI_FIRMWARE_VOLUMES=..\Fv\FvRecovery.fd
EFI_WIN_NT_FILE_SYSTEM=.!%EDK_SOURCE%\Other\Maintained\Application\UefiShell\bin\ia32\Apps
EFI_MEMORY_SIZE=64!64
EFI_BOOT_MODE=1
EFI_WIN_NT_CPU_MODEL=Intel(R) Processor Model
EFI_WIN_NT_CPU_SPEED=3000
8. Click "OK"
Debugging
 Now you are ready to actually debug. Press F5 (or select Debug|Start Debugging). It will always ask you if you want to rebuild the project, since we havne't added any source files which Visual Studio can use to determine if the project source has been changed. For now, choose Yes and then you will see the program begin to execute normally.
You can halt the execution of the emulated UEFI environment at any time by selecting Debug|Break All. Then you can set some breakpoints on a specific function using Debug|New Breakpoint|Break At Function and type in the function name. You can force a breakpoint by inserting a __debugbreak() into your code.
As the code executes you will notice that the Visual Studio window talks about various DLLs being loaded. The Windows-hosted environment actually loads your UEFI drivers and applications as DLLs (look in C:\Edk\Sample\Platform\Nt32\Uefi\Ia32). The actual main program is called SecMain.exe.
Conclusion
So now we're debugging. But what else can we do with the Windows-hosted (NT32) environment? Next time we'll look at how the environment can be configured.
This article assumes that you have already loaded the Visual Studio project to build the EDK's NT32 platform in C:\EDK as described previously.


5. Select "Working Directory" and enter "c:\edk\sample\platform\nt32\uefi\ia32".


EFI_WIN_NT_PHYSICAL_DISKS=a:RW;2880;512!g:RW;262144;512
EFI_WIN_NT_VIRTUAL_DISKS=FW;40960;512
EFI_WIN_NT_SERIAL_PORT=COM1!COM2
EFI_WIN_NT_GOP=Graphics Output Window 1!Graphics Output Window 2
EFI_WIN_NT_UGA=UGA Window 1!UGA Window 2
EFI_FIRMWARE_VOLUMES=..\Fv\FvRecovery.fd
EFI_WIN_NT_FILE_SYSTEM=.!%EDK_SOURCE%\Other\Maintained\Application\UefiShell\bin\ia32\Apps
EFI_MEMORY_SIZE=64!64
EFI_BOOT_MODE=1
EFI_WIN_NT_CPU_MODEL=Intel(R) Processor Model
EFI_WIN_NT_CPU_SPEED=3000
8. Click "OK"
Debugging

You can halt the execution of the emulated UEFI environment at any time by selecting Debug|Break All. Then you can set some breakpoints on a specific function using Debug|New Breakpoint|Break At Function and type in the function name. You can force a breakpoint by inserting a __debugbreak() into your code.
As the code executes you will notice that the Visual Studio window talks about various DLLs being loaded. The Windows-hosted environment actually loads your UEFI drivers and applications as DLLs (look in C:\Edk\Sample\Platform\Nt32\Uefi\Ia32). The actual main program is called SecMain.exe.
Conclusion
So now we're debugging. But what else can we do with the Windows-hosted (NT32) environment? Next time we'll look at how the environment can be configured.
HOW-TO: Set Up The EDK's Windows-Hosted UEFI Environment With Visual Studio 2008.
Since I'm working on a little research project of my own using UEFI applications, I thought I'd use the Windows-hosted UEFI (aka NT32) environment provided with the EDK. From previous experience, I know that the ability to debug applications using the Visual Studio environment speeds up my development time considerably. So I thought I'd share how I set up my environment. Then next time, I'll share how I set up for debugging.
This article assumes that you have Visual Studio 2008 installed and that the EDK has been downloaded to C:\EDK.
Create New Visual Studio Project
In this step, the goal is to set up Visual Studio so that it can build the Windows-hosted (NT32) UEFI environment. The build files for this project are located in C:\EDK\SAMPLE\PLATFORM\NT32.
 1. Select File|New|Project.
 2. Select the "General" project category and select "Makefile Project". Then enter the Name as "NT32". Then click "OK".
 3. The Makefile Project Wizard will pop up. Click "Finish"
 4. Your new project will appear in the Solution Explorer.
 5. Select the NT32 project with the mouse. Select Project|Properties.
 6. On the "NT32 Property Pages", change "Configuration" to "All Configurations".
 7. Select "Build Command Line" and then select the ... on the right edge.
 8. This will pop up a separate editor box. On three separate lines, enter the following text and click "OK".
cd /D c:\edk\sample\platform\nt32
set EDK_SOURCE=c:\edk
call build.bat
9. Now, for "Rebuild All Command Line" enter:
cd /D c:\edk\sample\platform\nt32
set EDK_SOURCE=c:\edk
call build.bat clean
call build.bat
10. Now, for "Clean Command Line" enter:
cd /D c:\edk\sample\platform\nt32
set EDK_SOURCE=c:\edk
call build.bat clean
11. Finally, for the last step, enter:
c:\edk\sample\platform\nt32\uefi\ia32\SecMain.exe
 12. Select OK.
13. Edit Config.env, which is located in C:\EDK\Sample\Platform\NT32\Build, and change USE_VC8 = YES. By default, it is set to NO, which will build with Visual Studio 2003 and a large number of build errors.
Launching The Windows-Hosted Environment.
At this point, should be able to build by selecting Build|Build (or using F7). You can run the emulated environment by going to the command prompt and typing:
cd /d c:\edk\sample\platform\nt32\uefi\ia32
SecMain.exe

 You will see (at least) two windows: the debug output console window and then the graphics output window. The graphics output window will show a fake logo, a progress bar and then boot into the built-in EFI Shell.
Conclusion
Well, that gets us to the first step. Next time we'll discuss how to set up the debugger and how to make your code debugger friendly.
This article assumes that you have Visual Studio 2008 installed and that the EDK has been downloaded to C:\EDK.
Create New Visual Studio Project
In this step, the goal is to set up Visual Studio so that it can build the Windows-hosted (NT32) UEFI environment. The build files for this project are located in C:\EDK\SAMPLE\PLATFORM\NT32.


cd /D c:\edk\sample\platform\nt32
set EDK_SOURCE=c:\edk
call build.bat
9. Now, for "Rebuild All Command Line" enter:
cd /D c:\edk\sample\platform\nt32
set EDK_SOURCE=c:\edk
call build.bat clean
call build.bat
10. Now, for "Clean Command Line" enter:
cd /D c:\edk\sample\platform\nt32
set EDK_SOURCE=c:\edk
call build.bat clean
11. Finally, for the last step, enter:
c:\edk\sample\platform\nt32\uefi\ia32\SecMain.exe

13. Edit Config.env, which is located in C:\EDK\Sample\Platform\NT32\Build, and change USE_VC8 = YES. By default, it is set to NO, which will build with Visual Studio 2003 and a large number of build errors.
Launching The Windows-Hosted Environment.
At this point, should be able to build by selecting Build|Build (or using F7). You can run the emulated environment by going to the command prompt and typing:
cd /d c:\edk\sample\platform\nt32\uefi\ia32
SecMain.exe


Conclusion
Well, that gets us to the first step. Next time we'll discuss how to set up the debugger and how to make your code debugger friendly.
Sunday, January 31, 2010
UEFI HII (Part 10): Images
Before starting, you should be aware that the term 'image' has two different meanings in UEFI. First, it refers to executables (EXE), such as drivers and applications, that get loaded into memory by the LoadImage() and StartImage() services. Second, it refers to rectangular, full-color images.
Support for these images started with the UEFI 2.0 specification, with the EFI_GRAPHICS_OUTPUT_PROTOCOL. This protocol provide device-independent services for moving bitmapped images back and forth from a video device. But, it provided no standard means for finding and managing these images.
Then the UEFI 2.1 specification introduced the HII Database. Each driver can install pre-packaged images into the database. Then the driver can manipulate or display them using the EFI_HII_IMAGE_PROTOCOL.
Image Attributes
Images have the following attributes:
- Identifier. Along with the database handle, this identifier uniquely specifies the image.
- Width. The number of pixels per image row.
- Height. The number of image rows.
- Transparent. Indicates whether the pure black pixels (RGB(0,0,0)) will be drawn transparently over the background.
- Bitmap. Image pixels are organized left-to-right and then top-to-bottom. Each image pixel consists of 32-bits. The first 8-bits in each pixel are the blue (0 = off, 255 = on), the next 8-bits are the green and the next 8-bits are the blue.

Image Services
The UEFI HII Image protocol provides two classes of services:
Get/Set. You can get an image from the HII database, change an image in the HII database and add a new image to the HII database.
Draw. You can draw an image, either using an image identifier or from a raw bitmapped image. In both cases, the drawing can be done directly to the screen or into another image, with or without clipping.
Conclusion
Images are slowly being integrated into firmware as an integral part, simply because of user expectations and a desire for OEMs to stand out in a crowd. UEFI 2.1 provides built-in support for basic image manipulation services. UEFI 2.3 also added support for animations. In our next article, we will look at how UEFI stores different types of images in the HII packages.
Saturday, January 30, 2010
UEFI HII (Part 9): Font Package Encoding
Ok, now into the gory details of how font packages are encoded. In many ways, font packages are like string packages except, instead of strings, we are talking about font glyphs. There is a font header, followed by font information and then a series of font blocks.

The glyph blocks represent the glyphs in sorted order, starting with the glyph for character value 0x0001 and incrementing from there. Each glyph block increments the character value by either 1 or N. There are five basic types of glyph blocks:


The glyph blocks represent the glyphs in sorted order, starting with the glyph for character value 0x0001 and incrementing from there. Each glyph block increments the character value by either 1 or N. There are five basic types of glyph blocks:
- Glyphs. These actually contain glyph data. There are variants for a single glyph or multiple glyphs, ones which use default character cell information or their own character cell information. The current character value is incremented by either 1 (for single glyph versions) or N (for multiple glyph versions).
- Duplicate. This block duplicates the glyph data for a character value that has already been processed. The current character value is incremented by 1.
- Skip. These blocks skip a specified number of character values. For example, there might be no glyphs for character values 0x2000-0x20FF, but then one more glyph for character value 0x2100. A Skip block leaves a gap. The current character value is incremented by the skip count specified.
- Defaults. This block sets up the default character cell information for the subsequent glyph blocks which use defaults. This is useful for fonts where a lot of characters share a specific set of information, such as Courier or other fixed-format fonts.
- End. This marks the end of the glyph block information.

In this case, the actual glyph data is 9 pixels wide and 11 pixels high. If optimally packed, this would lead to a storage size of 99 bits or 13 bytes (12 with 3 bits left over). However, when this was being discussed, some preliminary implementation data suggested that the glyphs were much easier to handle if each row was byte aligned (the blue shaded area in the diagram). Then, after testing with compression software (since we assumed that the fonts would be stored compressed) that the bit-packed data actually was larger after compression than the byte-packed data.
Conclusion
This wraps up the second on fonts. Next week, we'll dive into how HII stores and handles images.
Saturday, January 23, 2010
Harnessing The UEFI Shell
Just a quick plug to note that a book co-authored by myself and three Intel engineers (Mike Rothman, Bob Hale and Vincent Zimmer) is finally available for sale via Amazon or through Intel Press. UPS says that my personal copy arrives next Wednesday. Yeah!
UEFI HII (Part 8): Proportional Fonts
The UEFI Specification provids services and storage for manipulating bitmap fonts as part of the Human Interface Infrastructure (HII). Last week, we looked at the Simple Font, which describes a means of storing a fixed-width font for Unicode character values. Each character in the Simple Font is either in an 8 x 19 (narrow) pixel or 16 x 19 (wide) pixel character cell.
Proportional fonts extend bitmapped font support in several significant ways:
So, for UEFI, a font is a logical grouping of glyphs identified by a name, a size and a style.
The glyph is the image representation of the character, with each dot in the image represented by a single bit, on or off. The off pixels are either not drawn (for transparent drawing) or else drawn in the background color. The on pixels are drawn in the foreground color. For example, for the letter A, it might look like this:

But this isn't enough information to draw the glyph. For one thing, we don't know how much space to leave between this glyph and other glyphs that we have drawn. This is one of the key differences between this font and the simple font in the previous articles. Simple fonts have the empty space above, below, before and after the character image built into the glyph. Proportional fonts track this sort of information separately, using three key ideas:
The character cell is a box that the glyph's image is positioned inside of. Each font has a character cell and each character glyph's image is placed relative to the top-left corner of that cell, or box. For example:

Baseline
The baseline (or Offset Y) allows UEFI firmware to draw text from different fonts on the same line and still have everything line up correctly. The baseline is calculated as the number of pixels above the Origin of the tallest character image.

- There can be multiple fonts, each described by its name, height and style (bold, italics, underline, etc.).
- Each character cell in the font can be a different width.
So, for UEFI, a font is a logical grouping of glyphs identified by a name, a size and a style.
- Font Name. "The font name describes, in broad terms, the visual style of the font." How do you tell that a character is part of the Arial font? Or Times New Roman? Well, they tend to share certain visual characteristics, such as whether they have serifs, or whether they are rounded or angular or represent alphabetic characters or symbols.
- Font Size. "The font size describes the maximum height of the character cell, in pixels. The standard font always has the font size of 19." Rather than describing characters in terms of "points", the UEFI specification describes them in terms of the height of the character cell, in pixels. The UEFI specification does not use points, because (a) it only uses bitmapped fonts and (b) although points technically refers to 1/72nd of an inch, it actually does little to describe how much screen space a font will take up (except in comparison with another point size for the same font).
- Font Style. "The font style describes standard visual modifies to the base visual style of a font." In other words, you can have Arial, Arial + Bold, Arial + Italic, Arial + Bold and Italic, etc. They are still an Arial font, but they have additional stylistic modifiers. The UEFI specification explicitly supports bold, italic, underline, double-underline, embossed, outline and shadowed.
The glyph is the image representation of the character, with each dot in the image represented by a single bit, on or off. The off pixels are either not drawn (for transparent drawing) or else drawn in the background color. The on pixels are drawn in the foreground color. For example, for the letter A, it might look like this:

But this isn't enough information to draw the glyph. For one thing, we don't know how much space to leave between this glyph and other glyphs that we have drawn. This is one of the key differences between this font and the simple font in the previous articles. Simple fonts have the empty space above, below, before and after the character image built into the glyph. Proportional fonts track this sort of information separately, using three key ideas:
- The character cell.
- The baseline.
- The character advance.

The baseline (or Offset Y) allows UEFI firmware to draw text from different fonts on the same line and still have everything line up correctly. The baseline is calculated as the number of pixels above the Origin of the tallest character image.

In this picture, the baseline is the height of the tallest character (A). Notice that the character 'q' starts 3 pixels below the baseline, while both the 'A' and 'x' start on the baseline and the quotation mark (") starts 8 pixels above the baseline. The gap between the Origin and the left-most pixel of the glyph is known as Offset X. For the 'A' and 'q' and quotation mark, this is 1 pixel. For the 'x', this is 0 pixels.
Character Advance
The character advance is the number of pixels to move the Origin to the right. The character advance determines how much whitespace to put to the left and right of the glyph.
Conclusion
All of these details about offsets and baselines, advances and cells may seem intimidating, especially in a firmware environment. Many basic tasks become a lot more difficult when using proportional fonts: drawing text, editing a string or selecting text (with a mouse!). Fortunately, the EFI_HII_FONT_PROTOCOL provides functions which not only draw a string to a buffer or to the screen, but also report back information about the width and height of each character drawn. We will investigate these in more detail later.
Next week we will return to how the fonts are encoded.
Subscribe to:
Posts (Atom)


