Hello again and apologies for not sending some of you my code. I had lost it, but I have put it back together, and the code for image display and movement has been checked into the SysLib Sourceforge project, located here.
The projects are under Applications, and can be run from the shell like any other application. For further information on how to run applications, see this article.
UEFI News and Commentary
Friday, June 28, 2013
Tuesday, June 11, 2013
HOW-TO: Debug the EDK2's Windows-Hosted UEFI Environment in Visual Studio 2012
The NT32 environment is very useful for debugging UEFI applications which aren't tied to specific hardware devices. In this article, you will learn how to add debugging support in Visual Studio 2010.
This article assumes that you have Visual Studio 2012 and that you have the Visual Studio project to build the EDK2's NT32 platform in C:\sourcecode\edk2.
To set up EDK2's UEFI environment with Visual Studio 2012, click here.
To debug the UEFI environment with Visual Studio 2010, click here.
To debug the UEFI environment with Visual Studio 2008, click here.
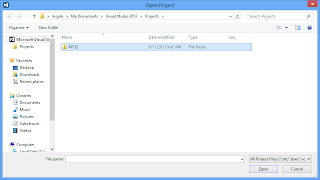 1. Open the NT32 project in Visual Studio 2012.
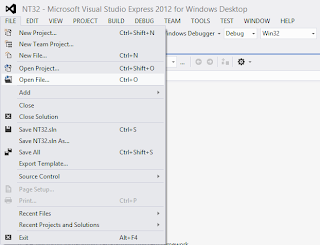
2. Go to File -> Open File...
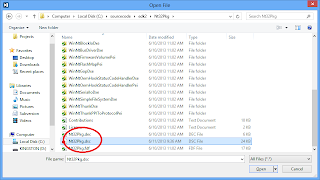 3. Because environment variables no longer work for NT32, we need to change the DSC file. Open Nt32Pkg.dsc (located in C:\sourcecode\edk2\Nt32Pkg\Nt32pkg.dsc).
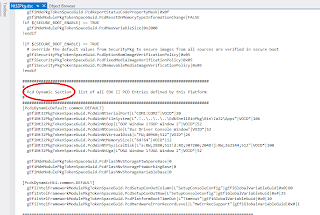
4. Find the section of Nt32Pkg.dsc labeled "Pcd Dynamic Section."
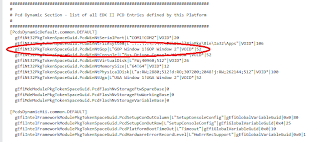 5. Find the line for PcdWinNtGop and change it so it reads as follows
gEfiNt32PkgTokenSpaceGuid.PcdWinNtGop|L"GOP Window 1!GOP Window 2"|VOID*|52
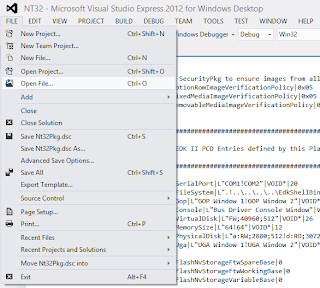
6.Again, got to File -> Open File...
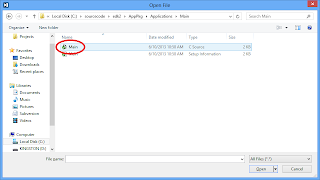
7. Open the file Main.c, which is located at c:\sourcecode\edk2\AppPkg\Applications\Main\Main.c
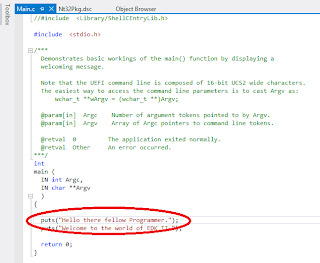 8. In Main.c, go to the line of code that reads as follows:
puts("Hello there fellow Programmer");
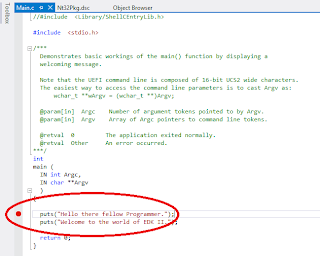 9. Press F9. A red dot should appear in front of that line of code. You have created a break in the code.
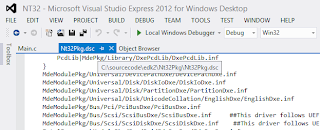
10. Use the tabs in Visual Studios to switch back to Nt32Pkg.dsc.
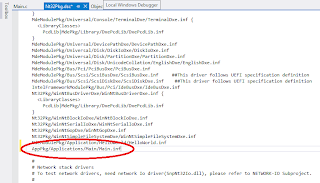 11. Find the line of code that has "HelloWorld" in it (The line should read MdeModulePkg/Applications/HelloWorld/HelloWorld.inf).
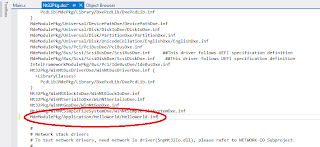
12. Under that line of code, write the following text:
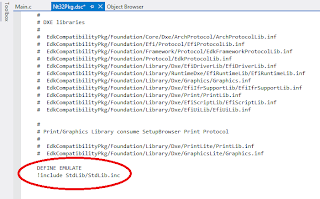 AppPkg/Applications/Main/Main.inf
13. Scroll down to the very bottom of Nt32Pkg.dsc and write the following text:
DEFINE EMULATE
!include StdLib/StdLib.inc
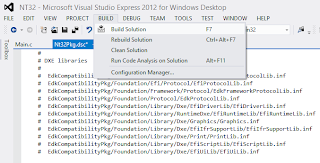
14. Go to Build->Build Solution.
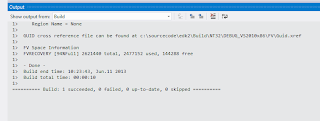
15. Wait for the Build to finish.
The picture to the right shows what the output box will display when it is finished.
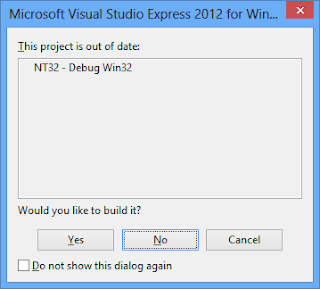 16. Press F5, then press "No" in the box that appears.
17. When the Graphics Output Window appears, hit "Enter" twice, or wait for the window to load completely.
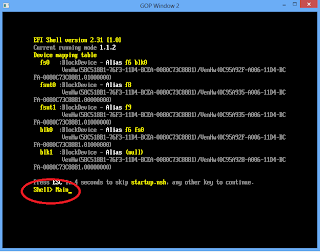 18. Type "Main" into the Graphics Output Window.
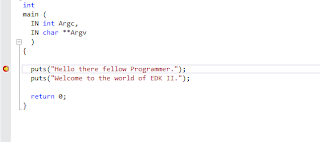 19. The process should halt and bring you to the Break you set in Main.c in Step 9.
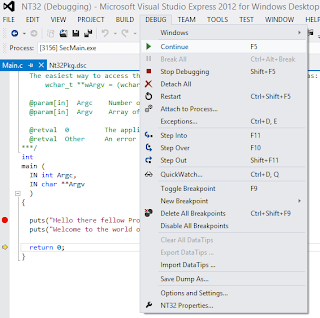 20. From here, F10 will bring you through the code line-by-line as it runs. You can also go to Debug->Continue to let the program continue normally.
You can halt the execution of the emulated UEFI environment at any time by selecting Debug->Break All. Then you can set some breakpoints on a specific function by using Debug->New Breakpoint->Break At Function and typing in the function name. You can force a breakpoint by inserting a __debugbreak() into your code or by hitting F9.

This article assumes that you have Visual Studio 2012 and that you have the Visual Studio project to build the EDK2's NT32 platform in C:\sourcecode\edk2.
To set up EDK2's UEFI environment with Visual Studio 2012, click here.
To debug the UEFI environment with Visual Studio 2010, click here.
To debug the UEFI environment with Visual Studio 2008, click here.
Set-Up
 1. Open the NT32 project in Visual Studio 2012.
2. Go to File -> Open File...
 3. Because environment variables no longer work for NT32, we need to change the DSC file. Open Nt32Pkg.dsc (located in C:\sourcecode\edk2\Nt32Pkg\Nt32pkg.dsc).
4. Find the section of Nt32Pkg.dsc labeled "Pcd Dynamic Section."
 5. Find the line for PcdWinNtGop and change it so it reads as follows
 gEfiNt32PkgTokenSpaceGuid.PcdWinNtGop|L"GOP Window 1!GOP Window 2"|VOID*|52

6.Again, got to File -> Open File...

7. Open the file Main.c, which is located at c:\sourcecode\edk2\AppPkg\Applications\Main\Main.c
 8. In Main.c, go to the line of code that reads as follows:
puts("Hello there fellow Programmer");
 9. Press F9. A red dot should appear in front of that line of code. You have created a break in the code.
10. Use the tabs in Visual Studios to switch back to Nt32Pkg.dsc.
 11. Find the line of code that has "HelloWorld" in it (The line should read MdeModulePkg/Applications/HelloWorld/HelloWorld.inf).
12. Under that line of code, write the following text:
 AppPkg/Applications/Main/Main.inf
13. Scroll down to the very bottom of Nt32Pkg.dsc and write the following text:
DEFINE EMULATE
!include StdLib/StdLib.inc

14. Go to Build->Build Solution.

15. Wait for the Build to finish.
The picture to the right shows what the output box will display when it is finished.
Debugging
 16. Press F5, then press "No" in the box that appears.
17. When the Graphics Output Window appears, hit "Enter" twice, or wait for the window to load completely.
 18. Type "Main" into the Graphics Output Window.
 19. The process should halt and bring you to the Break you set in Main.c in Step 9.
 20. From here, F10 will bring you through the code line-by-line as it runs. You can also go to Debug->Continue to let the program continue normally.
You can halt the execution of the emulated UEFI environment at any time by selecting Debug->Break All. Then you can set some breakpoints on a specific function by using Debug->New Breakpoint->Break At Function and typing in the function name. You can force a breakpoint by inserting a __debugbreak() into your code or by hitting F9.
Labels:
Debugging,
EDK2,
NT32,
Visual Studio 2012,
VS2012
Monday, June 10, 2013
HOW-TO: Set Up the EDK2's Windows-Hosted UEFI Environment With Visual Studio 2012
This article shows how to set up the environment for the Widows-hosted UEFI (aka NT32) in the environment provided by EDK2.
This article assumes that you have Visual Studio 2012 installed and that EDK2 has been downloaded to C:\sourcecode\edk2.
If you would like to create the environment in Visual Studio 2010, please click here.
If you would like to create the environment in Visual Studio 2008, please click here.

1. Select File -> New Project.
2. Select the "Visual C++" category and select "MakeFile Project." Enter the name as "NT32"
press "OK."
 3.The MakeFile Project Wizard will pop up. Click "Finish."
 4. The project should appear in the Solution Explorer.
 5. Select the project by right-clicking on the name, then select "Properties" from the right-click menu.
6. Select the category "Configuration Properties", then select "NMake."
 7. Under "General", select "Build Command Line." To the far right, a drop down arrow will appear. Click the arrow, then click "<Edit...>"
 8. A separate editor box will open. In the box, write the following text, then press "OK."
cd /D c:\sourcecode\edk2
set WORKSPACE=c:\sourcecode\edk2
call edksetup.bat --nt32
build
 9. In the "Rebuild All Command Line" editor box, write the following text, then press "OK."
cd /D c:\sourcecode\edk2
set WORKSPACE=c:\sourcecode\edk2
call edksetup.bat --nt32
build clean
build
 10. In the "Clean Command Line" editor box, enter the following text, then press "OK."
cd /D c:\sourcecode\edk2
set WORKSPACE=c:\sourcecode\edk2
call edksetup.bat --nt32
build clean
11. Go to the category "Debugging."
 12. Select "Command", and under the drop-down arrow menu, select "<Edit...>" then type the following text before pressing "OK."
c:\sourcecode\edk2\Build\NT32IA32\DEBUG_VS2012x86\IA32\SecMain.exe
 13. Select "Work Directory," and in the drop-down arrow menu, select "<Edit...>", then type the following text before pressing "OK."
c:\sourcecode\edk2\Build\NT32IA32\DEBUG_VS2012x86\IA32
14. Press "OK."
 15. At the location c:\sourcecode\edk2\BaseTools\Conf, there are two files: target.template and tools_def.template. Copy both files.

16. Paste the files to c:\sourcecode\edk2\Conf and change both files into .txt files.

17. Once you have moved these two files, open target.txt. Find the line that begins with After TOOL_CHAIN_TAG, the line reads MYTOOLS. Replace MYTOOLS with VS2012x86 and save the file.
TOOL_CHAIN_TAG.
 1. Go to Build -> Build Solution
 2. Wait for the build to finish. The text shown to the right should be the what is displayed in the output box when it is finished.
 3. Press F5. When a pop-up box appears, press "No."
At this point, at least two windows should open: the debug output console window and then the graphics output window.
The graphics output window will show a fake logo and a progress bar.
 The window will then boot into the built-in EFI shell.
This article assumes that you have Visual Studio 2012 installed and that EDK2 has been downloaded to C:\sourcecode\edk2.
If you would like to create the environment in Visual Studio 2010, please click here.
If you would like to create the environment in Visual Studio 2008, please click here.
Create New Visual Studio Project
These steps will set up Visual Studio 2012 so that it can build the Windows-hosted (NT32) environment.

1. Select File -> New Project.
2. Select the "Visual C++" category and select "MakeFile Project." Enter the name as "NT32"
press "OK."
 3.The MakeFile Project Wizard will pop up. Click "Finish."
 4. The project should appear in the Solution Explorer.
 5. Select the project by right-clicking on the name, then select "Properties" from the right-click menu.
6. Select the category "Configuration Properties", then select "NMake."
 7. Under "General", select "Build Command Line." To the far right, a drop down arrow will appear. Click the arrow, then click "<Edit...>"
 8. A separate editor box will open. In the box, write the following text, then press "OK."
cd /D c:\sourcecode\edk2
set WORKSPACE=c:\sourcecode\edk2
call edksetup.bat --nt32
build
 9. In the "Rebuild All Command Line" editor box, write the following text, then press "OK."
cd /D c:\sourcecode\edk2
set WORKSPACE=c:\sourcecode\edk2
call edksetup.bat --nt32
build clean
build
 10. In the "Clean Command Line" editor box, enter the following text, then press "OK."
cd /D c:\sourcecode\edk2
set WORKSPACE=c:\sourcecode\edk2
call edksetup.bat --nt32
build clean
11. Go to the category "Debugging."
 12. Select "Command", and under the drop-down arrow menu, select "<Edit...>" then type the following text before pressing "OK."
c:\sourcecode\edk2\Build\NT32IA32\DEBUG_VS2012x86\IA32\SecMain.exe
 13. Select "Work Directory," and in the drop-down arrow menu, select "<Edit...>", then type the following text before pressing "OK."
c:\sourcecode\edk2\Build\NT32IA32\DEBUG_VS2012x86\IA32
14. Press "OK."
 15. At the location c:\sourcecode\edk2\BaseTools\Conf, there are two files: target.template and tools_def.template. Copy both files.
16. Paste the files to c:\sourcecode\edk2\Conf and change both files into .txt files.

17. Once you have moved these two files, open target.txt. Find the line that begins with After TOOL_CHAIN_TAG, the line reads MYTOOLS. Replace MYTOOLS with VS2012x86 and save the file.
TOOL_CHAIN_TAG.
Launching the Windows-Hosted Environment
 1. Go to Build -> Build Solution
 2. Wait for the build to finish. The text shown to the right should be the what is displayed in the output box when it is finished.
 3. Press F5. When a pop-up box appears, press "No."
At this point, at least two windows should open: the debug output console window and then the graphics output window.
The graphics output window will show a fake logo and a progress bar.
 The window will then boot into the built-in EFI shell.
Subscribe to:
Comments (Atom)


