After making the simple app that uses composite images and transparency to change the appearance of an image based on user input (as described in
this article), I decided to expand it a little into the beginnings of a simple game. As it is now, it is simply a shell for a game, in which you can move a sprite around and change modes.
In this article, I will describe the thought process behind creating this as well as the code I wrote. This article assumes you have read the referenced article above on composite images and transparency.
Source code for this project can be found
here.
I knew I wanted this "game" to include the thermometer I had created, and have something affected by the changing temperature. I decided I could have a little character run around the screen and his color would change with the temperature. Because I was using the same thermometer as I did in my last project, I was able to use the same code. The only change I made was a simple image re-size to make it a little smaller.
The next question was how I wanted the playable area to be laid out. Would it be laid out in a grid, where each object occupied a square, or would it be free movement? Since collision detection in a free movement environment is much trickier than a grid, I decided to lay it out in a grid. This was a fairly easy thing to implement.

First, I created a struct to represent a square in the grid, which I called "Box." It has it's X and Y coordinates, an array containing pointers to the adjacent Boxes in each of the four cardinal directions, and a boolean value indicating whether or not the box is occupied by an object.

The next step was to initialize the grid, which is simply an array of boxes. So I started by clearing all the memory and initializing the first box's coordinates to (0, 0).

Now from here, I could have hard-coded all the values for every single box, but if I had decided to change the size of the grid, it would have been a big pain to rewrite, so I wrote a loop that initialized the coordinates and array of adjacent boxes for each box. For each of the boxes, I first set it's Occupied value to false (since each box is initially empty). I first then look in the East (right) direction to see if the box is on the right edge of the grid. If it's not, the East adjacent box is initialized to the next box in the array, and if not, East is set to NULL. Next, I check the North (up) direction to see if it is on the top edge of the grid. Like the East check, I initialize the North box if it's not on the top edge, and set it to NULL if it is on the top edge.

So along with initializing the array of boxes, we also need to initialize the coordinates, which we can do in the checks for the West edge. We can do as we have done with North and East, and initialize the West value. However, after that, we can begin initializing coordinates. If the box is not on the West (left) edge of the grid, then it can base its X coordinate on the box to its left, and simply add the width of an image (which is the same as the width of a box). Its Y coordinate is simply the same as the box to its left. If it
is a left-edge box, then its X coordinate is 0, and the Y coordinate can be gotten by adding the box height to the Y coordinate of the box above it. Finally, we do the South check, just like the others were done, and finish initialization of the boxes.
Now I needed to deal with the images. In this application, I had six images: the background image, the character sprite, an object sprite, and the three thermometer images. I did the same thing as described in the articles referenced above, except with more images. All the image setup was done in the same function, and the image buffers stored in global variables. Details about the image setup can be seen in the previous articles or the source code (link provided above). In the source code, I have included a miniature .FDF file that includes the additional lines I added which allow the appropriate images to be included. In order to use this, copy the text from my .FDF file and paste it into the FILE statements section of Nt32Pkg.FDF.
The only thing I did differently with regards to image display was in ConvertBmpToGopBlt(). One of the conditions for images was unnecessarily strict, and would sometimes cause the function to falsely report an invalid bitmap image, so I removed it. The line used to read:
if ((BmpHeader->Size != BmpImageSize) ||
      (BmpHeader->Size < BmpHeader->ImageOffset) ||
      (BmpHeader->Size - BmpHeader->ImageOffset !=  BmpHeader->PixelHeight * DataSizePerLine)) {
    return EFI_INVALID_PARAMETER;
  }
I removed the third condition so it now reads:
if ((BmpHeader->Size != BmpImageSize) ||
(BmpHeader->Size < BmpHeader->ImageOffset)) {
return EFI_INVALID_PARAMETER;
}
Which causes it to work properly.

Before we move onto the components of the actual game, we need to remember that in this game, we will be moving around a character as well as changing the temperature on the thermometer. We could use different keys to change the temperature and move around, but I decided it would be best if the character were standing still while the temperature changed, so I made it so that the user could change which "mode" they were in, movement, or temperature change. The mode is implemented using an enum, and stored in a global variable.

Up next is the actual character itself that the user can move around. It contains a pointer to the buffer containing the original image, a pointer to the altered image (since we are going to change the image's color over the course of the game), its coordinates, and the box it is currently occupying. We make the character a global variable, since there is only one.
Initializing the character struct is simple and can be done as soon as the images and grid are set up. We first set the mode to be "MOVE" since we would like that to be the initial setting. Image is set to point to the buffer referenced by the global variable. The image is then copied into a new buffer, and ChangedImage points to that new buffer. This way, ChangedImage can be altered without affecting the base original image. Then, the coordinates and box are set to be the upper left-hand corner (just an arbitrary position).
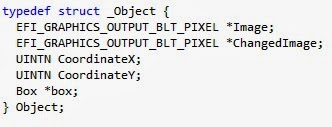
After this, I decided to have some sort of additional object on the map along with the character. So I created a basic Object struct. It has an Image, ChangedImage, coordinates, and box it occupies. This is actually basically the same as the Character struct, and in the future, I could go back and combine the two into one. There is only one non-character object in this application, but multiple objects could simply be stored in a global array.
Initializing and setting up objects is similar to that of initializing the character. In this program, I only included one object, but it would be simple enough to expand the function to deal with multiple objects. Like the character image initialization, we set Image to be the globally accessible buffer, and ChangedImage to be a copy of the Image buffer. The coordinates and grid position are set, and then we set the assigned box to be occupied.

Now we turn our attentions towards player actions. The first and most basic action a player can take is to move. Since we used a grid, the movement is easy to do. Basically all it does is check the box adjacent to where the character currently is, and see if it is null or occupied. If not, it changes the character's box and coordinates to that of its new location.

The next is its color change. Now, this method does nothing incredibly special. It simply multiplies the pixel colors by the percentage height difference of the thermometer. It makes sure the colors never go above their maximum value, and are never negative. The nice thing about this is that will not alter black pixels (which, in my implementation are interpreted as transparent), so pixels intended to be transparent will remain that way, whatever color changes might occur. Notice that the transformations are based on the original image's color. This way, colors at a given temperature are always the same. Another possible implementation of this is to have the blue color increase and red decrease as the temperature decreases, and vise versa as the temperature increases.
Finally we get to the actual game loop itself. It is just a do-while loop that waits until an end condition is reached (in this case, until the END key on the keyboard is pressed). All it does is sit around and wait for the user to press a key on the keyboard. If it's one of the arrow keys, and the game is in MOVE mode, it moves the character. Otherwise, if it's in TEMP mode, it will change the temperature and change the player's color only if it's an up or down arrow key. In this implementation, the mode is changed by pressing the PgUp key. After that, it displays the images in their new positions. Once the end condition has been met, the memory is freed, screen cleared, and we return success! In the images below, the image on the left shows the key scanning, and the right image shows the image display and cleanup.
And that's all she wrote!